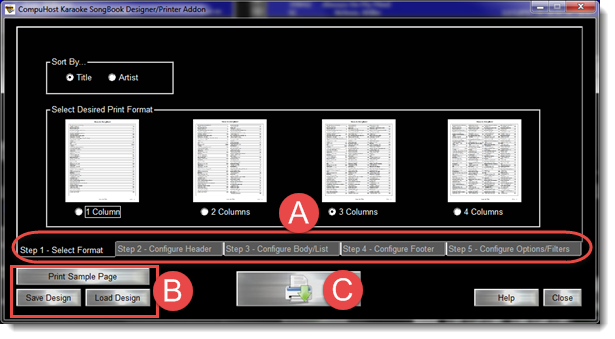
Main Designer Screen
(Image 1)
Sample Printed SongBook Page
(Image 2)

|
SongBook Designer/Printer
| [Previous] [Main] [Next] |
SongBook Designer/Printer (Optional)
This is an optional feature and must be purchased separately. Please visit www.karaokeware.com/addons for purchasing information.
Main Designer Screen
(Image 1)
Sample Printed SongBook Page
(Image 2)
| · | Choose the desired sort you wish for this songbook.
|
| · | Choose the desired print format.
|
|
|
| · | Enter the Header Text you wish printed at the top of each page (A)(Image 2)
|
| · | Choose the desired Font and Style for the printed Header Text (A)(Image 2)
|
| · | Choose the desired Font Color for the printed Header Text (A)(Image 2)
|
|
|
| · | Choose the desired Font, Style and Case to be used for the body/song selections (B)(Image 2)
|
| · | Choose the desired Text Color for the "Main Listings" (C)(Image 2) and the "Sub-Listings" (D)(Image 2)
|
| · | Choose the desired "Shading Color" for the Main Listing (C)(Image 2)
|
| · | Choose whether you wish the song selections (body) enclosed in a border/box.
|
|
|
| · | Enter the Footer Text you wish printed at the bottom of each page (E)(Image 2)
|
| · | Choose the desired Font and Style for the printed Footer Text (E)(Image 2)
|
| · | Choose the desired Font Color for the printed Header Text (E)(Image 2)
|
| · | Choose whether you wish the SongBook Revision Date and/or Page Numbers printed on each page.
|
|
|
| · | Activate any desired option(s)
|
| · | Print Brand Identifiers: If activated, the TWO character brand identifier of all available brands for each song selection will be printed adjacent to the selection.
|
| · | Remove Vocals: If activated, any listing containing the word(s) "W/Vocals" or "Vocals" will be omitted.
|
| · | Remove Duplicates: If activated, all duplicate selections (exact same Song Title and Artist Name) will be combined into a single song listing. If "Print Brand Identifiers" is activated, all available brands will be provided with the listing.
|
| · | Print Song Numbers: If activated, the corresponding song number for each selection will be printed. You'll also be able to choose the desired Song Number/Identifier ("CompuHost Assigned (ie: 12534)" or "Manufacture Disc ID (ie: SC1625)"
|
| · | Filter by Date Added: If activated, you may designate a "Date Added Range" of each selection you wish included in the songbook. This is useful for creating interum "New Songs" or "Updates" songbooks. When used in combination with the "Print SongBook Revision Date" option (Tab 4), from the "Start Date" drop-down, you may select the first date following the "revision date" of your last complete songbook to print ONLY the selections added to your catalog since the last complete songbook was created.
|
|
|
| · | Click the "Save Design" button and choose and name and folder location for your SongBook Design File (SDF). Later you may click the "Load Design" button to instantly recall/setup your design for immediate printing.
|
|
|
| · | Click the "Print SongBook" button (Large button, bottom/center)
|
| · | Choose the desired destination of the printed songbook...
|
| · | PRINTER: The songbook will be sent to the selected printer device.
|
| · | PDF FILE: A "Portable Document File" (PDF) will be created. Useful when wishing to utilize the services of a third party printer (Kinkos, OfficeMax, Printing Co. etc). Simply provide the third party printer with the resulting PDF file.
|
| · | To preview the songbook before actual printing activate the "I wish to preview before printing" option.
|
Using the SongBook Previewer
(Image 3)
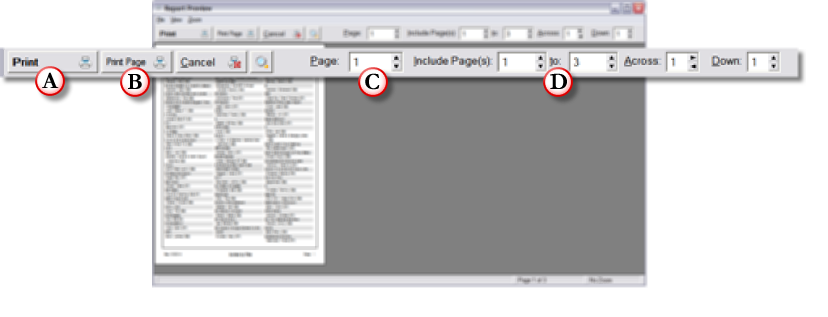
| · | To launch the SongBook Previewer simply select the "I wish to preview before printing" option when selecting the print destination (Step 8 above)
|
| From within the SongBook Previewer you may...
|
| · | Print: Print your entire songbook (A)(Image 3)
|
| · | Print Page: Print ONLY the selected page. (B)(Image 3)
|
| · | Page: Select the a page (C)(Image 3)
|
| · | Include Pages: Select a "range of pages" to print. Useful when needing to reprint certain pages without needing to reprint the entire songbook.
|